Go Big or Go Home!
I have been using Photoshop to create digitally stitched panoramic images for many years, even back in my days of using film. Now I often shoot 5 or 6 overlapping digital images to create a large panorama. 
They print beautifully and Photoshop stitches single row images so well that I have very little work to do to finish the images.
We have had several single photos printed as very large panoramic images for corporate interiors. Our images have also been used for billboards. Most recently this image was reproduced as a billboard in England:
The above image was shot on Medium Format slide film and scanned with a film scanner. These scans are 500 MB 16 bit images. They look quite beautiful blown up bigger than life size with the largest reproduction being over 20 feet wide. The largest single digital image I have had commercially reproduced was 17 feet wide, shot with my 1Ds Mark III. It looks great a long as you don’t Pixel Peep too much.
Thomas Moran at 44 Wide introduced me to the Gigapan Epic Pro. The images he is shooting with this device are stunning! Large beautiful images that have astonishing detail. I have been testing this Gigapan and plan to add it to my landscape workflow. Although it’s not practical for some situations, the Epic Pro allows you to stitch several rows of images creating mind-blowing resolution. I have stitched up to 88 images together, creating a 1.67 GB image.
The set up is quite simple.
Here is my work-flow:
Once processed the image will need some editing and cropping: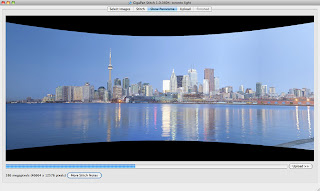
There is still a lot to learn about the Gigapan. It certainly slows you down when you are capturing over 70 images. I will continue to share my results as I progress.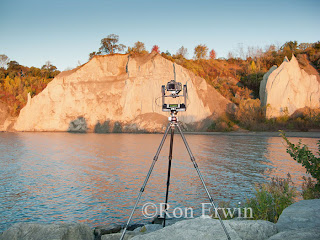
Tombstone Viewpoint - Click for larger
They print beautifully and Photoshop stitches single row images so well that I have very little work to do to finish the images.
Cloud Reflection - Click for larger
We have had several single photos printed as very large panoramic images for corporate interiors. Our images have also been used for billboards. Most recently this image was reproduced as a billboard in England:
Kayaks at Inverness - Click for larger
The above image was shot on Medium Format slide film and scanned with a film scanner. These scans are 500 MB 16 bit images. They look quite beautiful blown up bigger than life size with the largest reproduction being over 20 feet wide. The largest single digital image I have had commercially reproduced was 17 feet wide, shot with my 1Ds Mark III. It looks great a long as you don’t Pixel Peep too much.
Thomas Moran at 44 Wide introduced me to the Gigapan Epic Pro. The images he is shooting with this device are stunning! Large beautiful images that have astonishing detail. I have been testing this Gigapan and plan to add it to my landscape workflow. Although it’s not practical for some situations, the Epic Pro allows you to stitch several rows of images creating mind-blowing resolution. I have stitched up to 88 images together, creating a 1.67 GB image.
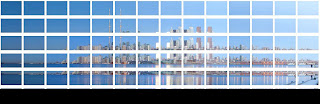
Toronto Gigapan - Click for larger
The set up is quite simple.
Here is my work-flow:
- Charge batteries.
- Mount the Epic Pro on the tripod.
- Mount the camera on the Epic Pro and connect the release cable.
- Determine the zoom setting for the lens.
- Level the unit.
- Camera Setup. Pick a point in your image. From the main Menu, select Camera Setup. Adjust so that an object in your scene is at the top of the frame. Once you set this point, move the camera down so that this same point is at the bottom of the frame. This will determine how much the unit must move to overlap the images.
- Focus your lens and then switch to manual focus.
- From the main menu, select New Panorama.
- Set the upper left of the scene. Then set the lower right.
- Shoot the panoramic.

Once processed the image will need some editing and cropping:

There is still a lot to learn about the Gigapan. It certainly slows you down when you are capturing over 70 images. I will continue to share my results as I progress.

Labels: Gigapan Epic Pro, panoramas, panoramic, Toronto
posted by Ron Erwin at
14:30
![]()


0 Comments:
Post a Comment
Subscribe to Post Comments [Atom]
<< Home